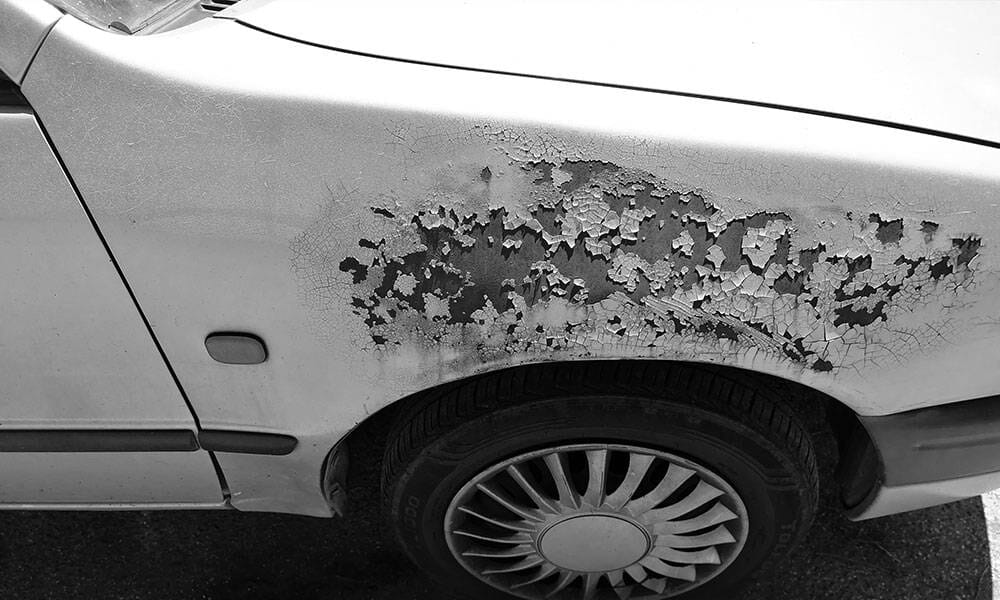
Paint not looking so fresh these days? Perhaps it’s lost its brightness and sharp reflections. Or maybe it has picked up a nasty layer of dirt and grime from the tens of thousands of miles that you’ve put on the odometer. Worst of all, there may be some nasty scratches and stone chips that require immediate attention.
Whatever the problem, you can remedy it by buffing the paint.
★★★★★ "My car is slick as glass!! I put the Ceramic Spray on my Corvette Stingray and it is very slick and shiny. I should have purchased it sooner. It is a great product. It made my wheels look new. Keeps off dirt and dust." - Charlie F.
What is Buffing? EXPLAINED
Buffing is a collective name for many things - compounding, polishing, waxing, wiping various products on or off the panels. Even drying the car with a cloth is considered buffing.
These are all vastly different actions. What gives?
All “buffing” describes is the wiping or rubbing motion you’re performing with your hand and a cloth or a specialized pad. It can really mean anything that causes some confusion to beginner detailers, who’re having a hard time differentiating between various jobs.
Buffing vs. Polishing
Polishing is a form of buffing. You buff the body panel with a cutting or polishing compound and a towel or special pad to level out scratches, remove pitting and surface contaminants.
You can buff by hand or with various types of machines to speed up the work and get better results. Once you’ve made your passes, you’ll also buff out the polishing compound to clean the surface and examine your results.
Buffing vs. Waxing
Waxes and paint sealants are buffed into the surface, then are buffed again with a clean microfiber towel to remove the excess product.
Depending on the product, ceramic coatings can be applied in a couple of ways, one of which is buffing it into the surface with a microfiber towel. Regardless, all-ceramic coatings are buffed off after flashing to level the surface, preventing high spots and streaks.
Cleaning products like quick detailer sprays can also be buffed on or off.
The Secret To A Solid Buff: Prep work
It doesn’t matter if you're polishing the paint or refreshing an aging sealant. Like any other detailing operation, before you begin buffing, you want to clean the car vigorously and decontaminate the paint.
Start with a general car wash to remove the loose dust, dirt, and traffic film accumulated on the surface. If the car was waxed, sealed, or ceramic coated, a good wash should be the only thing you need. But if you never protected the paint, there’s inevitably some severe contamination to deal with.
The clear coat looks flat and solid; however, it’s actually porous on the microscopic level. Some contamination like mineral deposits, salts, acid residue, brake dust, and others will lodge themselves in the cavities and dry as an integral part of the top surface layer. Add to that paint overspray, tar, cement, goop, and splatter from birds and bugs, and it gets nasty.
These will persist no matter how many times you wash the vehicle. You don’t want to buff all this junk back onto the paint, so you have to decontaminate the surface.
Decontamination Wash
The decontamination process uses special products that dissolve the contaminants mentioned above and allow you to wash them away. Usually, that means using a decontamination soap, like Torque Detail’s Decon Soap, which breaks down bug guts, bird droppings, tree sap, brake dust, mineral deposits, and overspray. Mix the product in a bucket of water and wash as you usually would. Decon Soap will also strip down any current wax or sealant to prepare the surface for detailing.
Our Decontamination Wash Pack also includes a microfiber wash mitt that will minimize the scratching and marring on the clear coat.
WARNING: Decontamination soaps have strong chemistry and are not a replacement for your regular car soap. Only use them once every 4-6 months.
Clay the Paint
Despite using a decontamination soap, some impurities and pollutants might remain behind. You can’t see them, but you can feel the rough spots when you run your fingers across the paint.
The second step to decontaminating your paint is performing a clay bar pass.
The clay is a putty-like material that’s mildly abrasive but also sticky. When it encounters brake dust or mineral deposits, it will catch on the rough texture and shear them off. Since it's sticky, it will capture loose contaminants, and after you fold it over, you can continue cleaning the surface until every inch is smooth and slippery to the touch.
WARNING: Don’t try to rub detailing clay dry on the panel! You’ll quickly realize it tries to catch and stick to the paint, potentially scratching it in the process. Automotive clay is always used with a dedicated lubricant that helps it glide across the body panel.
Torque Detail has designed its own reusable clay pad that’s easily washed free of contaminants. We’ve packed it together with a special clay lube, so you can get to work immediately.
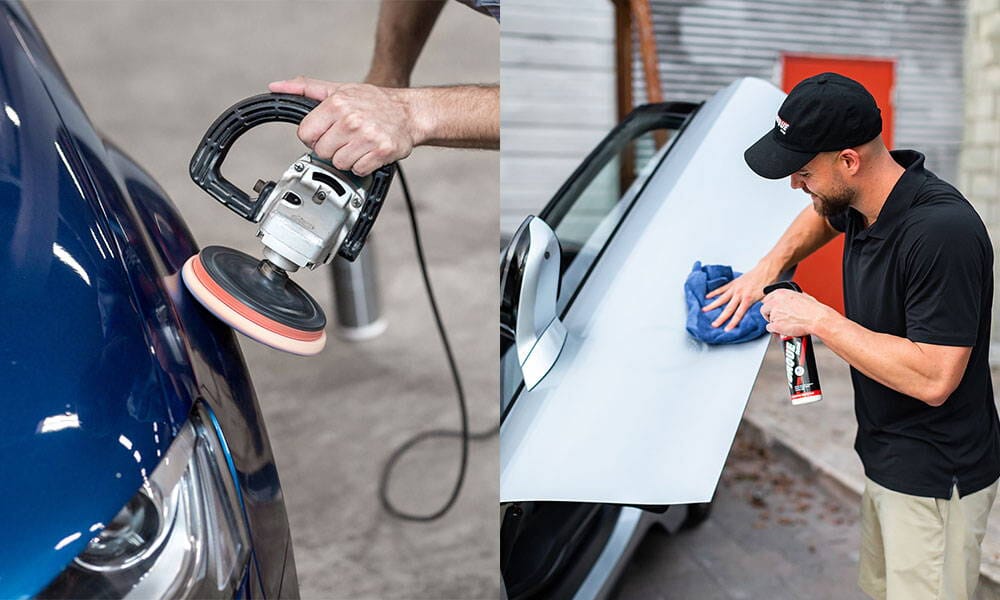
How to Buff Your Car by Hand AND Get Machine-Like Results
The simplest and cheapest way to buff your car is doing it by hand. All you need is a product of your choice, a corresponding buffing pad or microfiber towel, and lots of elbow grease.
When we’re talking about polishing, you can produce acceptable results by hand, but it's usually limited to smaller areas, lighter scratches, and surface contaminants. Polishing the whole vehicle by hand is physically demanding and challenging to get consistent results and even shine.
That said, if your paint is in good overall condition, you can brighten the bodywork and restore its reflections by hand. Try Torque Detail’s Reverse: Car Scratch Remover. It’s a polishing compound that’s designed for hand buffing. It is the perfect, easy-to-use product for the paint correction stage of washing a car.
The reverse will remove light scratches, swirl marks, paint oxidation, brake dust deposits, contamination, and water spots. Just squirt a small amount onto a microfiber towel and start buffing the surface. Work in small sections one at a time - think 12-inch squares or similar sized spots.
Hand buffing has an advantage in that it’s a cheap and safe method to detail your vehicle. It’s pretty simple, and any beginner can do it without causing any harm.
Where it falls short is the effort required. Modern clear coats are much harder than automotive paint in the 50s and 60s when hand buffing was the standard. To get a heavily scratched vehicle looking perfect, you need to put your back to it, press very hard, and move back and forth very fast. This will drain your stamina quickly, and you’ll only complete a panel or two before you’re chasing after your breath. You’ll also need to use lots of compounds to get the work done. For a DIYer, this is not a giant problem. For a pro detailer, detailing many cars every week, it can get tedious.
You can also apply waxes, sealants, and coatings by hand. They don’t require too much physical effort, and you can get the car coated in under an hour. We will cover this later in the “Protect Your Paint” section of this guide.
Machine Buffing Your Car For Complete Beginners
Machine buffing is much faster and more effective in removing deep scratches. It produces an even finish with half or even a quarter of the product required to complete the job by hand.
An experienced detailer can machine buff a car in a couple of hours, where you’ll need the entire weekend to do it by hand and still won’t get the same quality of results.
Novice detailers are afraid of trying out a mechanical buffer on their car for the first time. The incorrect setup and technique can put awful scratches on the surface, produce hologram effects or overheat the paint.
While true, the detailing community has produced an excessive amount of content and documentation on virtually every type of buffing machine, pad, and compound.
TIP: We always recommend getting a couple of panels from the local scrap yard and performing your first buffing job on those. This will allow you to test your machine and set up and remove the anxiety of scratching your car’s paint.
Prep The Body Panel
Before you begin buffing, you want to do some prep work on the body panel.
Use masking tape to tape the edges of the body panel and prevent the product from seeping into the panel gap. You don’t want to run the machine on the very edge because you can quickly overheat it and cause damage.
Next, tape everything you don’t want to buff - the headlights, taillights, badges, emblems, vinyl stickers, plastic molding, and trim pieces. You want to be careful around these areas, and it’s best to finish them by hand.
What Machine to Use?
Let’s go over the most common machine buffers used in detail.
The orbital buffer is a mechanical replacement for your hand buffing the surface in circles. This tool is great for applying waxes and sealants but generally too weak to do any heavy cutting. You might be able to lightly polish and brighten the paint with the appropriate pad and product.
If you’re an absolute beginner looking to take their first steps at mechanical polishing, stick to a random orbital buffer/polisher. This machine combines an orbital or circular motion and a free rotation, producing a random pattern on the surface, evenly polishing the paint, and removing all scratches.
★★★★★ "My car is slick as glass!! I put the Ceramic Spray on my Corvette Stingray and it is very slick and shiny. I should have purchased it sooner. It is a great product. It made my wheels look new. Keeps off dirt and dust." - Charlie F.
The backing plate is connected to the head of the machine, which is attached off-center to the drive shaft. As the motor runs, the head orbits with a known throw, specified in the documentation. The head also rides on a bearing, so its momentum and the friction between the pad and surface cause it to spin around its axis randomly.
The random orbit buffer is perfect for beginners because it has decent cutting power, yet, the free rotation of the head makes it very difficult to harm the paint. This machine is excellent for light and medium scratches, but it may prove difficult to remove some really deep ones.
TIP: As a beginner, it’s best to accept you won’t get 100% perfect results and satisfy yourself with “good enough,” rather than trying too hard and causing damage to your paint by accident.
Dual-action polishers are the standard tool for professional detailers. They have two powered motions and provide more strength and cutting power. DA machines get the work done easier and faster but require some experience to handle it safely.
Rotary polishers work identically to an angle grinder - just spinning in one spot, though at a slower speed. These machines are the most powerful but also the easiest to cause damage to the paint. Only use one if you have solid detailing experience and guidance from a professional.
What’s the Difference Between Various Pads and Compounds?
There are a plethora of pads available on the market. Let’s look at some of the most commonly used ones.
- Wool pads - These are highly abrasive and are usually only used for cutting operations. The cutting can level out deep scratches but leaves scratches and marks on its own. You always have to follow up with a polishing operation to restore shine and gloss to the clear coat.
- Microfiber pads - These are less abrasive than wool pads but still provide lots of cutting power. There are microfiber pads for the cutting and polishing stages.
- Foam pads - These are the most commonly used pads and have different hardness for cutting, polishing, and finishing operations. A finishing operation is one that applies a top coat of wax or sealant and completes the detailing job. Foam pads are preferred because they leave fewer marks and imperfections behind and have a more significant margin of error before they produce defects or damage the paint. Foam pad sets are usually color-coded to differentiate the purpose and hardness of each pad.
Buffing compounds come in paste form and contain varying amounts of abrasive particles that do the cutting and polishing and lubricants that reduce the friction and keep the surface cooler. Just like pads, there are compounds for cutting, polishing, and various steps in between. There are also single-stage compounds that are designed to remove scratches or blemishes and polish the paint in one operation.
Each manufacturer has its own standards for pads and compounds. While there is a loose correlation between products from different manufacturers, always test your setup before going full tilt on the car.
How to Clean And Maintain Your Pads
Buffing pads are reusable, but you have to maintain them. The best practice is to run your machine on a sacrificial terry cloth towel after each panel to remove the spent product, paint residue, and other gunk before applying more product and moving onto the next panel.
After you’re done, you can wash buffing pads in a bucket of warm water and dish soap by simply squeezing the solution through them, then rinsing them off and drying them with a clean towel. Most household detergents easily break down polishing compounds, wax, sealant, and other products.
It’s harder to do it if they’re all dried up, so to make it easier on yourself, have some soapy water ready when you finish buffing. You can throw your pads in there to soak, finish detailing your car, and then come back to wash them up.
If the pads are already dried up, you’ll need a soft brush to scrub the polish out. Then you can wash them as described.
Manufacturers will sell you their pad cleaner solution. You can buy it if you want, but homemade solutions work just as well.
Can You Buff With a Drill Attachment?
One trend on the rise with DIYers is using a polishing adapter for a cordless handheld drill to polish their car.
Any serious detailer reading is already cringing uncontrollably and cursing us for even mentioning the idea. This definitely is not the best method to polish your car; however, it can work okay for smaller areas and complex curvatures.
Drill polishing adaptors are dirt cheap - usually under $20, and you can buy them with a pack of pads or use your own, so long as they’re the same diameter. The pads attach to the head with a hook and loop system and turn your drill into a makeshift rotary buffer.
Of course, a drill only runs up to about 2,000 RPM - nowhere near the 8,000 RPM dual-action buffers achieved. So, it’s going to be slower, less effective, and you won’t get a pattern variation, meaning you have to compensate with more passes and attention to detail.
That said, the drill will help you remove light scratches and contamination, improving the shine and reflectivity of your paint. Don’t expect miracles, but once you get the hang of it, it’s way faster than doing it by hand.
Tips For Beginners
Here are some of our tips for avoiding common beginner mistakes:
- Contrary to hand buffing, very light pressure is needed when working with a machine. Let the machine do its work and spin freely on top of the surface.
- Hold the buffing pad flat on the surface at all times and continuously move at a few inches per second. Move it in straight lines in a crosshatch pattern to cover the entire work area.
- Separate the panel into smaller areas. For example, slice the hood in four sections and buff them one at a time while overlapping the borders.
- You don’t need too much product - 4-5 penny-sized blobs are enough. That said, you also don’t want to run the pad dry. Saturate it with compound and spread the product over the area before you start buffing.
- Inspect frequently and be ready to accept some imperfections, at least for your first couple of tries.
We have more tips and detailed information in our article - How To Polish A Car Like A Pro! The DIY Detailer’s Guide
Protect Your Paint
Buffing is quite the ordeal. Even if you’re an experienced detailer, it will still take you a good few hours to clean, decontaminate, prep and buff the vehicle, then clean it again.
You achieved great results, and the paint is looking fantastic; however, this progress will quickly fade if you leave everything like that.
After all the hard work, it’s worth spending another 30 minutes to apply wax or sealant on the body and protect the paint from UV damage and contamination.
Which coating to use is a debate we’ve discussed in-depth in another article - Wax vs. Sealant.
The best option is to apply a ceramic coating, which produces an actual glass layer on top of the clear coat and protects it from heat, UV rays, acids, degreasers and other chemicals, mineral deposits, brake dust, and all other sources of contamination.
The best of the best are liquid nano-ceramic coatings which contain 75%+ SiO2 particles. However, those are a hassle to apply because you have to watch for flashing and meticulously buff the coating to level the surface. Any errors will result in high spots, streaks, and other defects, which require sanding if the coating has already cured.
A DIY-friendly alternative is our 3-step Ceramic Coating Kit which is sprayable and easily applied on the surface. You still need to buff it off and watch for flashing and rainbow effects, but it’s easier and less prone to errors and defects since it runs thinner.
★★★★★ The FIRST EVER sprayable 7H Ceramic Coating! It took us years in the lab to finally be able to introduce: a sprayable ceramic coating that will rank on the 7H scale. That means you’re getting 2 years of protection and unbelievable shine while being much easier to apply than traditional small 1 oz bottles..
Conclusion
Okay, this was our little venture into buffing. What did we learn?
Buffing is a collective term that describes all wiping and rubbing actions. Buffing can be performed by hand or with a machine.
You can use an electric buffer to cut and polish your paint to remove scratches and contamination. You can buff products like wax and sealant into the paint to protect it by hand.
Pretty much everything you do as a detailer involves some buffing action.
I help run the day to day for America's Number #1 Car Wax Mirror Shine by Torque Detail. As a Certified Detailer by the International Detailing Association, I use that knowledge to help create products that get professional grade results with super simple application techniques.